0086-519-82305398
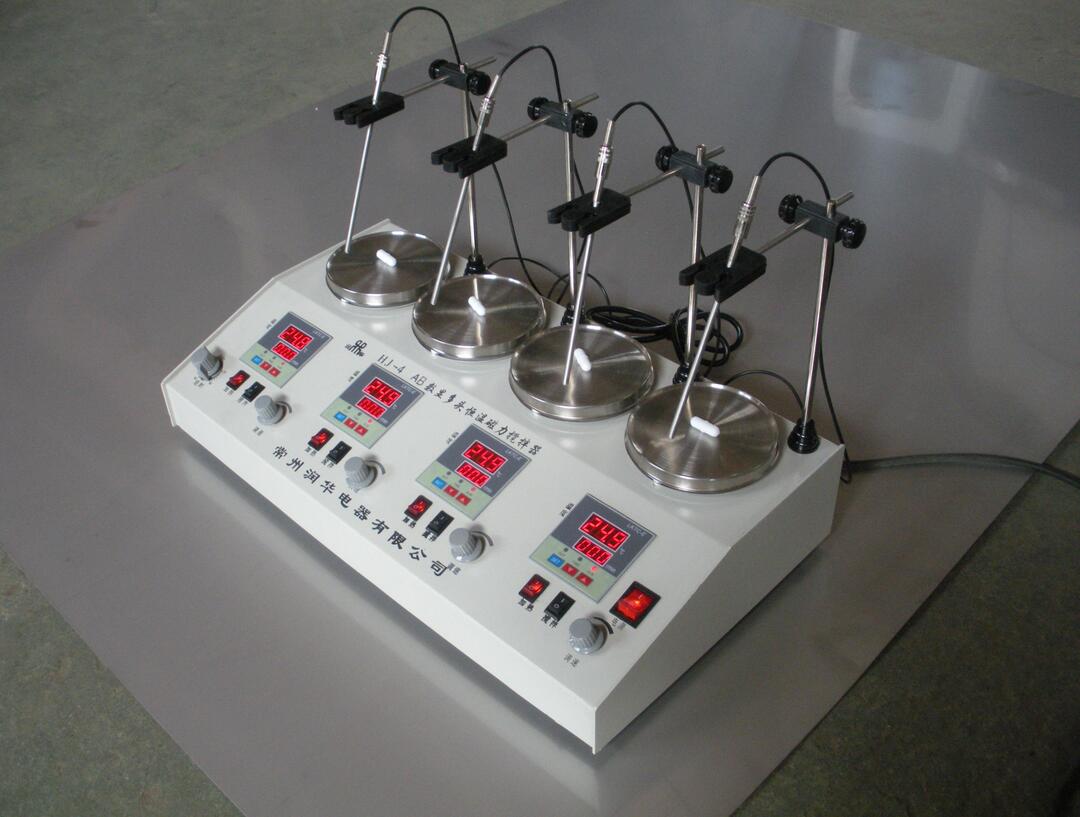
Overview:1、 Introduction: Hj-4ab multi head constant temperature and speed measuring magnetic stirrer is widely used in Colleges and universities, environmental protection, scientific research, health and epidemic prevention, petrochemical, metallurgy, medica…
Consulting1、 Introduction:
Hj-4ab multi head constant temperature and speed measuring magnetic stirrer is widely used in Colleges and universities, environmental protection, scientific research, health and epidemic prevention, petrochemical, metallurgy, medical and other departments. It has good performance, no noise, no vibration and remarkable mixing effect. It is an ideal and necessary tool for laboratory technicians
Technical parameters:
Electric source: single phase AC, 50 Hz, 220 V ± 10 v
Working mode: 4 sets of constant temperature, independent speed measurement, independent temperature control and independent speed regulation magnetic stirrer
Heating mode: digital display temperature control
Speed measurement range: 0-2400r / min
Heating power: 300wx4
Motor type: brushless motor
Working disk size: 125mmx4
Maximum mixing capacity: 1000mlx4
Temperature control range: room temperature - ~ 100 ° C
Temperature control accuracy: ± 0.5 ℃
Speed regulation mode: stepless speed regulation: 0-2400r / min
Speed measurement method: 4 mixing heads are used to measure the speed separately
4 independent temperature control panel heating mode
usage method:
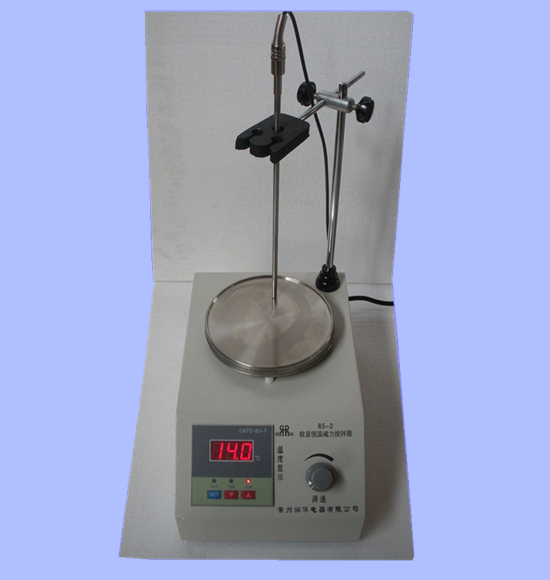
When using the instrument, first check whether the accessories are complete, and then install the fixture in order, and plug in the temperature control sensor for standby. (Note: please insert the sensor according to the number, and do not exchange with each other, so as to avoid affecting the temperature control accuracy. Remember to put the required experimental solution into the beaker or flask, and then put it into the stirrer, and put it in the center of the chromium plating plate, Put the sensor of stainless steel rod into the liquid of the container, plug in the power supply, turn on the power switch, the indicator light is on, turn on the working switch, the indicator light is on, turn on the mixing switch respectively, adjust the speed control knob respectively, and select the mixing speed you need from left to right (from low speed to high speed), The speed display does not need to be set. The speed and speed will be displayed under the digital display of stirring start, and it is not allowed to start directly at high speed, so as to prevent the agitator from being out of sync and causing jumping. To set the temperature, press the set key to enter the temperature setting mode to set or view the set value. Press the set key to see the number flashing. In the setting mode, press the up button to increase the setting value and the down button to decrease the setting value. If you keep pressing the button, it will increase or decrease to the value you need. After setting, press the set button again to exit the setting mode and return to the normal working measurement mode.
Note: the following parameters have been adjusted by the company's technical department before delivery. Internal parameters can not be adjusted without special needs, so as to avoid errors.
Adjust parameter SC: press the set key for 3 seconds and enter the internal parameter setting adjustment interface. The interface shows that SC is the error calibration value, indicating the error between the measured value and the actual value of the temperature controller. The default value is 0.0. You can press the set key again to display the flashing number to enter the adjustment state (the following parameter setting method is the same), and press the up or down button to adjust the value. (-9.9~9.9)
E: After setting, press the set key to enter the next parameter adjustment. The interface shows that e represents the advance of breakpoint control (only effective when p value is set to 0). The default value is 0.5, and the adjustment method is the same as that of SC.
P: Then press the set key to enter the third parameter. The interface shows that P indicates the setting of P value, and the meaning of P value is roughly the starting control temperature = set value - (10 / P value). If it is set to 50 degrees, when p is 10, it means that 49 degrees begin to control; when p is 4, it means that adjustment begins at 47.5 degrees. If the temperature overshoot is too large, adjust the p value appropriately. If the temperature rises too slowly or the control temperature is not reached, adjust the p value appropriately. Note: when p value is 0, the breakpoint control mode is entered. That is, the system PID fails. When the temperature is lower than (set value - E value) , it will start heating, otherwise it will stop heating.
c: Press set key to enter parameter C. the last parameter is reserved in the system temporarily. Please do not adjust it. The default value is 10.0.
Al: press the set key to enter the setting of parameter Al, which indicates the high temperature alarm value. That is, when the temperature > set temperature + Al, the instrument will alarm at high temperature. Ti: press the set key to enter the setting of parameter ti. Ti is the timer and the unit is minutes. 0 means that the timing mode is off; otherwise, when the Ti value of the instrument works for minutes, it will enter the stop state and stop the output of the load end. After setting all parameters, press set key to save parameters and return to normal working state.
Instructions:
Heat light: the leftmost heating indicator light, on means heating, off means stop heating.
Upper row nixie tube: temperature control part display
Lower row nixie tube: speed measurement display (only those with speed measurement function can display speed)
There is no need to carry out any operation. When this process is carried out several times, the specific experiment will be better. Because the temperature value is relatively stable at this time, the power supply should be cut off when it is not working. To ensure safety, please ground the ground wire when using it. The instrument should be kept clean and dry, and no solution is allowed to enter the machine to avoid damaging the machine parts
matters needing attention:
Heating time should not be too long, intermittent use can prolong life
It can work continuously at medium speed and 8 hours at high speed
Please read the manual carefully for correct use
If it is not used for a long time, please wipe it and put it in a dry and ventilated place
Changzhou Runhua Electric Appliance Co., Ltd
Address: 26 Jinsheng East Road, Jintan City
website: www.runhuayiqi.com
Email: 394514722@qq.com
Tel: 0519-82305398, 82301086, 82321286
Fax: 0519-82306938
Welcome to the official website of Runhua Instruments. We are a professional manufacturer of laboratory instruments. Quality and reputation a…
The water bath constant temperature shaker is a biochemical instrument that combines a temperature controllable constant temperature water ba…
Series of biochemical incubators:Features of 150A biochemical incubator: the biochemical incubator has the function of cooling and heating tw…
High-precision stirring water bath produced by Runhua Instruments:1) The general water bath does not have the circulating stirring function. …
Maintenance and maintenance of electric mixer1. Correct use and attention to the maintenance of the instrument to keep it in good working con…
What work should be done in the use of digital display stainless steel electric heating plate? Digital display stainless steel electric h…